I came across a link I wanted to share while searching for lesson plans to help with teaching diversity to the kids. Now, with our background, my kids know all about diversity, but I want to start by teaching them key figures in history that I was never taught about growing up. You see, where I'm from, the version of history I was taught was never relevant to me, ie. B-O-R-I-N-G.
I remember in high school having to do an assignment where I had to choose a past era in which I'd want to live and write about it. Needless to say, I racked my brain all night only to come up with a very scary, mind-bending answer, which my history teacher (with her love of the Confederacy, no less) had no choice but to respect and go along with: There is no place in history, as an African-American woman, that I'd want to be. You see, plain, frank, and simple, there's really no place for us there where we weren't met with hostility, discrimination, ridicule and other not-so-rosy things.
Even though it would make others so much more comfortable to hear it, I can't truthfully say we've satisfactorily progressed today, even with an African-American Prez in office. However, thanks to the tireless efforts and sacrifice that the people who supported, conducted, pushed for, died for the Civil Rights Movement, we're so much better off than we used to be, and for that, I am grateful.
Having a sense of heritage is very, very, very, very important, as I came to learn when first stepping foot on an HBCU campus full of unfamiliar African-American faces, faces that should have been "home" to me, but instead were strange and foreign- how silly. The least I can do for my kids is ground them with knowledge of the world around them as it pertains to them, give them a sense of belonging, and with that, a sense of pride and confidence that they are not useless or unwanted just because beautiful images of them don't commonly grace the covers of popular magazines, tv ads, visages of doll babies, or more importantly, the pages of HISTORY TEXTS.
Teach your kids this stuff, no matter what race or origin you are. Go beyond the usuals and really explore African-American history. And don't stop there!- the whole world's history has so much exciting stuff to offer if you only look. To do anything less is a great disservice to your kids and THE WORLD, because they will make up the world of the future, insha'Allah, and ignorance has no place anywhere.
Here's a great place to start, a cartoon story telling all about the life and timeline of Dr. Martin Luther King Jr. I hope you enjoy the journey through history with your child(ren), no matter where it takes you. I know I will.
Other useful links:
A to Z teacherstuff- Themes: MartinLuther King Jr
Education World: Dr. Martin Luther King Jr.
Lesson Plans Page: BlackHistoryMonth
Monday, January 31, 2011
Thursday, January 27, 2011
Chemistry for Kids, Part 2: Acids and Bases
Lesson 2/Week 2: Acids and Bases
 Review/Introduction"Matter, the stuff around us, is used to create atoms. Atoms are used to create the elements. Elements are used to create molecules. It just goes on. Everything you see is built by using something else." Source: http://www.chem4kids.com/files/atom_intro.html
Molecules- Show pics at this link and explain what each is/does: http://www.nyhallsci.org/marvelousmolecules/marveloussub.html
Water Molecule is made up of 2H's and 1O (draw on whiteboard)
Demonstrate in drawing how acids and bases "take" from water: H goes to acid/OH goes to base.
Split water molecule in drawing on white board. Compare split to a matching game: if you were to play matching with a split-up water molecule, the match would be OH-H, not OH-OH or H-H.
Common acids: Fruit juice, battery acid, vinegar (pH 4), lemon juice, shampoos
Acids taste sour & Acids are corrosive (they eat away at things)
ex. soda will dissolve a nail or a coin over time bc of the citric acid in it
Acids lose their acidity when mixed with bases
Bases
Common bases: bleach, soap, hair conditioner, drain cleaner, baking soda (pH 8)
Bases are slippery and taste bitter
Bases lose their basicity when mixed with acids
Strong acids and strong bases can be dangerous- never touch, taste, swallow, or smell them because they can burn you or make you sick!!
Source: http://schooldownthelane.wordpress.com/2008/02/04/science-class-4-acids-and-bases/
Why they interact with each other and weaker acids/bases: They share/swap OH's & H's until each one is "happy" or neutral. Show pH scale how neutral is in the middle.
Activity: Use M&M's and ask them to swap in groups of 2 until everyone is happy with the amount they have.
Pre-make the following 7 solutions for use in the Experiments below:
2qts Water + 2 cups baking soda 1qt Water + 1 cup sugar 1qt Water + 1/2 cup salt
1qt Water + 1/4 cup citric acid 1qt Vinegar 1/2 qt lemon juice
Red Cabbage Solution*
* Add chopped Red Cabbage to boiling water, allow to simmer until water is a deep purple, then allow to cool, separate the cabbage leaves from the water using a colander, refrigerate when not in use.
Experiment: Have some fizzy fun!
....by adding several of our proven acids (lemon juice, citric acid solution, vinegar) to some baking soda and seeing if a stronger acid reacts more strongly. The kids then checked some of our bases (soap, baking soda, borax) to see if anything happened (nope) and the neutrals (water, sugar water, salt water) as well (ditto).
Source: http://schooldownthelane.wordpress.com/2008/02/04/science-class-4-acids-and-bases/
Experiment: Does an acid or base clean pennies better?
Split into groups of 2, give each group 6 dixie cups, 6 dirty pennies.
Cleaning solutions we're using: lemon juice, vinegar, citric acid solution, soapy water, baking soda water, borax water) Drop a penny into each cup of cleaning solution and wait a few minutes before examining the penny to see if it's shiny.
Source: http://www.miamisci.org/ph/lpexpand1.html
Experiment: Let's see if we're right!
Red cabbage water is an indicator of pH. Although it can't be used to determine exact pH, it can distinguish between acid (pH of 0 to 6), neutral (pH near 7), and base (pH of 8 to 14).

0 1 2 3 4 5 6 7 8 9 10 11 12 13 14
In this activity:
Activity: Invisible Ink Writing.
You can even use the power of acid and base chemistry to write secret messages! You can write a message in invisible ink by doing this: Dip a Q-tip in baking soda solution and write a message on white paper- careful not to use too much liquid! Once the paper dries, rub a red grape over the message OR spray the message with a spray bottle filled with Red Cabbage Indicator. Handy hint: using a hair dryer speeds things up.
Activity: Magic Liquids
Materials: 1 cup water, 1 cup baking soda solution (above), 1 cup water + vinegar, Red Cabbage Indicator, 3 glasses/clear cups
-Fill each of the three cups with one of the first three liquids above.
-Take turns adding the Red Cabbage Indicator to each, ask children to predict what color each will turn.
Source: http://www.miamisci.org/ph/lpexcite2.html
Activity: Blow up a balloon using baking soda and vinegar.
Pour vinegar into a bottle with a narrow neck (soda or water bottle, cleaned out, no label) until it is about 1/4 of the way full. Use a funnel to put a small amount of baking soda in a deflated balloon. Place lip of balloon over rim of bottle and shake the baking soda out, then watch it inflate. Explain that the reaction between the acidic vinegar and the basic baking soda gives off gas that causes the balloon to inflate.
 Review/Introduction
Molecules- Show pics at this link and explain what each is/does: http://www.nyhallsci.org/marvelousmolecules/marveloussub.html
Water Molecule is made up of 2H's and 1O (draw on whiteboard)
Demonstrate in drawing how acids and bases "take" from water: H goes to acid/OH goes to base.
Split water molecule in drawing on white board. Compare split to a matching game: if you were to play matching with a split-up water molecule, the match would be OH-H, not OH-OH or H-H.
Acids & Bases
AcidsCommon acids: Fruit juice, battery acid, vinegar (pH 4), lemon juice, shampoos
Acids taste sour & Acids are corrosive (they eat away at things)
ex. soda will dissolve a nail or a coin over time bc of the citric acid in it
Acids lose their acidity when mixed with bases
Bases
Common bases: bleach, soap, hair conditioner, drain cleaner, baking soda (pH 8)
Bases are slippery and taste bitter
Bases lose their basicity when mixed with acids
Strong acids and strong bases can be dangerous- never touch, taste, swallow, or smell them because they can burn you or make you sick!!
Source: http://schooldownthelane.wordpress.com/2008/02/04/science-class-4-acids-and-bases/
Why they interact with each other and weaker acids/bases: They share/swap OH's & H's until each one is "happy" or neutral. Show pH scale how neutral is in the middle.
Activity: Use M&M's and ask them to swap in groups of 2 until everyone is happy with the amount they have.
- Scientists use the pH (parts Hydrogen) scale to tell if an acid or base is weak or strong. Water is neutral.
- "Knowing whether something is acidic or basic can be very useful. For example, wasp stings are alkaline but bee stings are acidic. So if you get stung you need to put bicarbonate of soda on a bee sting and vinegar on a wasp sting. Hair conditioner is slightly alkaline as shampoo tends to be slightly acidic, so any traces of shampoo can be neutralised by the conditioner."
Experiments/Activities
Knowing what we now know about acids and bases, we're going to do a series of experiments to help us try and guess whether something is an acid or base and/or see how they react/what they do.Pre-make the following 7 solutions for use in the Experiments below:
2qts Water + 2 cups baking soda 1qt Water + 1 cup sugar 1qt Water + 1/2 cup salt
1qt Water + 1/4 cup citric acid 1qt Vinegar 1/2 qt lemon juice
Red Cabbage Solution*
* Add chopped Red Cabbage to boiling water, allow to simmer until water is a deep purple, then allow to cool, separate the cabbage leaves from the water using a colander, refrigerate when not in use.
Experiment: Have some fizzy fun!
....by adding several of our proven acids (lemon juice, citric acid solution, vinegar) to some baking soda and seeing if a stronger acid reacts more strongly. The kids then checked some of our bases (soap, baking soda, borax) to see if anything happened (nope) and the neutrals (water, sugar water, salt water) as well (ditto).
Source: http://schooldownthelane.wordpress.com/2008/02/04/science-class-4-acids-and-bases/
Experiment: Does an acid or base clean pennies better?
Split into groups of 2, give each group 6 dixie cups, 6 dirty pennies.
Cleaning solutions we're using: lemon juice, vinegar, citric acid solution, soapy water, baking soda water, borax water) Drop a penny into each cup of cleaning solution and wait a few minutes before examining the penny to see if it's shiny.
Source: http://www.miamisci.org/ph/lpexpand1.html
Experiment: Let's see if we're right!
Red cabbage water is an indicator of pH. Although it can't be used to determine exact pH, it can distinguish between acid (pH of 0 to 6), neutral (pH near 7), and base (pH of 8 to 14).
acid neutral base
0 1 2 3 4 5 6 7 8 9 10 11 12 13 14
- If the indicator turns the solution red or pink, the solution is an acid.
- A purple solution indicates that it is neutral, neither an acid nor a base.
- If the indicator turns the solution blue or green, the solution is a base.
Activity: Invisible Ink Writing.
You can even use the power of acid and base chemistry to write secret messages! You can write a message in invisible ink by doing this: Dip a Q-tip in baking soda solution and write a message on white paper- careful not to use too much liquid! Once the paper dries, rub a red grape over the message OR spray the message with a spray bottle filled with Red Cabbage Indicator. Handy hint: using a hair dryer speeds things up.
Sources: http://www.york.ac.uk/res/sots/activities/acidtest.htm & http://www.miamisci.org/ph/lpexcite3.html
Activity: Magic Liquids
Materials: 1 cup water, 1 cup baking soda solution (above), 1 cup water + vinegar, Red Cabbage Indicator, 3 glasses/clear cups
-Fill each of the three cups with one of the first three liquids above.
-Take turns adding the Red Cabbage Indicator to each, ask children to predict what color each will turn.
Source: http://www.miamisci.org/ph/lpexcite2.html
Activity: Blow up a balloon using baking soda and vinegar.
Pour vinegar into a bottle with a narrow neck (soda or water bottle, cleaned out, no label) until it is about 1/4 of the way full. Use a funnel to put a small amount of baking soda in a deflated balloon. Place lip of balloon over rim of bottle and shake the baking soda out, then watch it inflate. Explain that the reaction between the acidic vinegar and the basic baking soda gives off gas that causes the balloon to inflate.
Monday, January 24, 2011
Visiting the National Smithsonian Air and Space Museum

I took the Yellow/Green line to L'enfant Plaza, and since I had the stroller, I took the elevator up- it's at the very end of the platform. Once outside, I walked (it was left for me) about a block or two toward C Street (it turns into Maryland Ave to the right), then once I crossed C Street/Maryland Ave in front of me I saw the sign with the Smithsonian Map. The Air and Space Museum and the stroller/accessible entrance was directly across the street to my right. Click here for a Map, if you need a visual.
You can also take the Orange/Blue line to Smithsonian but I haven't tried that way yet, so you would have to ask the Metro attendant for directions once you get off the train and/or study the map at the link above.
Once inside the Museum, the Einstein Planetarium is upstairs, but go in past security and to the right to get your free tickets into the show from the IMAX ticket booth. On the way to the ticket booth, you will pass the elevator on your right (again, because of the stroller), just go back here to go upstairs and the Planetarium entrance will be to your left.

Tips for Visitors:
- It's crowded most of the time, but stroller-friendly although you will find it easier to abandon your stroller from time to time to check out certain exhibits so...
- I recommend bringing a backpack to keep your personal belongings with you hands-free.
- I also recommend you check out their security procedures on their website so you know what to expect and what not to bring. They weren't too strict with food in that we could bring closed containers (ziploc bags, juice boxes, etc.) in with no hassle, I think they just mean to prevent patrons from eating inside the museum. Think: bugs, mice, and lots of extra cleaning avoided, which keeps admission free.
- I brought in our refillable BPA-free water bottles, which go everywhere with us, by the way.
- To save some money, pack a good lunch and lots of snacks if you plan to make a day of it and...
- Admission is FREE so don't feel obligated to see everything in one day- there's way too much to see for that, especially with kids.
- Should you choose to not pack a lunch...If you're up for a slightly uphill 10 min walk straight up 7th street to Chinatown, there are some great and not-too-expensive restaurants there where you can choose to grab-and-go or sit down. Note: The Green Turtle at the Verizon Center location offers a free kid's meal per one adult meal that you purchase. The food is so-so for my tastes but it'll do.
- The good news is, the Gallery Place Metro stop is right here and you can head on home once you're done eating, no need to walk all the way back to where you started, as it's serviced by Green/Yellow and Red lines. If you came in on Orange/Blue, you can get on here and transfer at another stop.
- To find the elevator down if you have a stroller, find the Dunkin Donuts on the left side of the Verizon Center, pass it by a few feet and look behind the diagonal column and poof! There's the elevator, nice and hidden in plain sight.
- In the interest of saving money, avoid the food carts as the food is usually way overpriced, especially near popular tourist attractions and of poorer quality, or you just get way less than you should for the price.
Thursday, January 20, 2011
Chemistry for Kids, Part 1

Good news is, I navigated through all the rough spots and pulled from my good 'ol science background just so I could share what I compiled and taught with other teaching mamas who would be so bold as to brave such a subject with the littles.
Even more good news: the kids loved it! The Activities we did along with this lesson are in a separate post to cut down on length.
Over the next 6 weeks, every Thursday, I'll be posting my lesson plan for the week, along with links I referenced along with other sources to give credit where credit is due- and I ask that you please do the same if you use these. Be sure to check back in for more Chem fun!
Lesson 1/Week 1: Introduction to Chemistry
What they did: In 1858 August Kekulé (1829–1896) and Archibald Scott Couper (1831–1892), two young men from different backgrounds, independently recognized that carbon atoms can link directly to one another to form carbon chains. They both had daydreams that Carbon atoms did some sort of happy dance together, holding "hands". This meant that other elements could follow the same rule.
What is Matter?
- Everything is made up of matter except energy, 6 types (light, heat, sound- for now; nuclear, electrical & mechanical- for later, advanced class).
- Matter has mass, mass has weight when gravity pulls down on it. To demonstrate, hold up a heavy, dense ball & a lightweight ball of the same size for comparison and let the kids hold them as well to conceptualize that there are so many little parts, or atoms, in the denser ball that gravity has more to pull down on.
- States of matter are Solid, Liquid, Gas and Plasma.
- Almost everything (matter) is made up of atoms and when atoms join together they become molecules (different) or elements (same).
- A lot of one type of atom gives us elements (ex. copper, aluminum, carbon)
- Atoms are made up of Protons, Electrons & Neutrons, (have kids repeat the words back) Introduce the Periodic Table just so they perhaps will recognize it when they see it again. Discuss: It's like a map through the elements
- Atoms are made up of smaller parts called protons, neutrons in the center and elections that orbit the center just like the earth orbits the sun.
- Show them common things they'll encounter such as O-we breathe it, He-makes balloons float, is lighter than air, Al- Foil, Fe- Ferris Wheel building material, Cu-a penny or some electrical wire, Ti-Titanium shears, blades only, so they know the little letters and squares have meaning and make sense. I brought in Titanium shears, a penny, and a piece of aluminum foil in a Ziploc bag as a visual. Explain that ONLY Al is in the foil, nothing else (for all intents and purposes), Ti in the blades of the fabric shears, and Cu in the penny.
- Draw helium atom on white board (below) and show how it correlates to the periodic table. (2e, 2p, 2n) explain that the nucleus is at the center and it's very heavy. Explain that a bunch of these Helium atoms are what make balloons float and stay up, and even though we can't see it, we know it's there because they float. Can even mention that Protons are positive and are the opposite of Electrons (ex. hot/cold, dark/light, positive/negative), which are negative and neutrons stay out of it, are neutral. P's and E's balance each other out so the atom is happy.
- Explain: It's hard for scientists to see or take pictures of atoms because they are so small but they have made models to show what they look like so the rest of us can "see" them.
Helium Atom
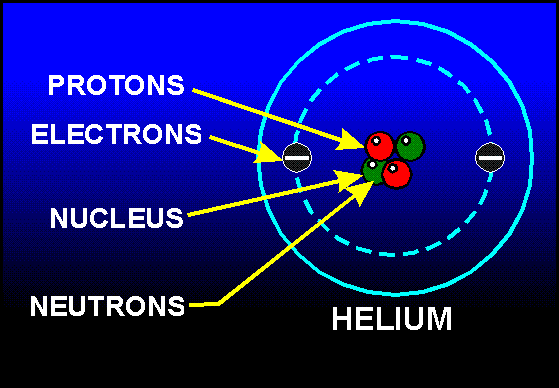 |
| Image source: http://www.tpub.com/neets/book7/0004.GIF |
In a nutshell: Protons + Neutrons + Electrons(make up)-->Atoms(make up)-->Molecules (different atoms bonded together) and Elements (same atoms bonded together)
Lesson 1/Week 1- Introduction to Chemistry Links
http://www.homeschoolhelperonline.com/lapbooks/chemistry.htm
http://www.sciencetech.technomuses.ca/english/schoolzone/Info_matter.cfm
http://www.associatedcontent.com/article/2804354/homemade_lava_lamp_craft_for_kids.html?cat=24
http://www.sciencetech.technomuses.ca/english/schoolzone/matter3.cfm
Subscribe to:
Posts (Atom)